Showing posts with label teacher appreciation. Show all posts

Friday, May 10, 2013

Teacher Appreciation Week, Day 5

Welcome to Day 5, the final day of Teacher Appreciation Week.

I found some beautiful hanging flower baskets at Walmart for $3.88.  I thought these would make a great gift for the last day of the week.  I created this little sign to go in the basket.


Again for today's project, I used all scraps from my scrap bin.  I love these little projects that help me reduce my scraps!  The plaid pattern paper is 3" high x 3 3/8" wide.  You probably can't tell in the picture, but this paper has glitter in it so it shines a bit.  I used my corner punch to round the edges and I inked  them with an orange Studio G ink pad.  The white layer over it is 2 3/4" high x 2 5/8" wide and again I inked the edges with orange and used my corner punch and adhered it with foam tape for some dimension.  The sentiment was printed on my computer using fonts: Action Is, Century Gothic, KG Strawberry Limeade, and Penshurst.  I used Scotch quick dry glue to attach the tag to a popsicle stick I had left over from a St. Patrick's day project.  


I thought the sign was too plain so I added the butterfly.  It was an extra cut I had left over from another project I'm working on.  This butterfly was cut with the Indie Art Solutions Cricut cartridge sized at 2 3/4".


I hope you enjoyed my projects for Teacher Appreciation Week.  I had so much fun making these that I'm kind of sad it's over!  I'll be back tomorrow with a cute Mother's Day card, hope to see you!


Thursday, May 9, 2013

Teacher Appreciation, Day 4

Welcome to Day 4 of Teacher Appreciation Week!  I have a yummy project today!


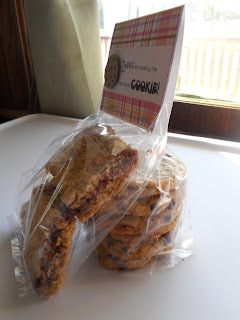
 I thought it was time for some sweet treats for a sweet teacher!  Here is the treat bag topper I made:


I started with a piece of white cardstock sized 4 x 6.  I then folded in half to make a bag topper sized 4 x 3.  I went through the scrap bin and found this pretty plaid paper and cut it down to 3 3/4 x 2 3/4 and adhered to the front of the topper with my ATG tape.

Then I went to my computer and printed out the sentiment "thanks for making me one smart cookie!" and cut this down to 1 1/2 x 4 and adhered with ATG tape.  The fonts used are Strawberry-Limeade, Century Gothic and Gretoon.  I used my Sweet Shop Cricut cartridge to cut out the little cookie at 1 inch and adhered with foam tape to pop it up a little.

I was looking around on Pinterest and couldn't decide what to make, so I made two :)

These are Raspberry Oatmeal Cookie Bars from Allrecipes.com.  For the recipe, click here.


And I thought since the cookie on the front of my topper looked like a chocolate chip cookie I needed to make some of those also.  Now there are a TON of chocolate chip cookie recipes out there and I had seen this one on Pinterest labeled Perfect Chocolate Chip cookies that I just had to try.  I generally prefer a crunchy chocolate chip cookie, and these came out soft and chewy.  If you are one who prefers chewy chocolate chip cookies, this is a great recipe!  


And here it is all put together


Thanks for joining me today!  I'll be back tomorrow with Day 5, the final day of Teacher Appreciation Week!  Have a great day!

Wednesday, May 8, 2013

Teacher Appreciation, Day 3

Hi Everyone!  This is Day 3 of Teacher Appreciation Week.  Today's project is probably my favorite of them all!

I have quite the candle collection.  I love candles, I love all the different smells of candles you can get.  I love all the colors they come in, I love the different sizes and shapes, I just love eveything about them.  So, of course, I had to use a candle as a gift this week!  I dug through my collection of jar candles and pulled out a Honeydew scented candle I had in my cabinet that hadn't been burned yet and dressed it up for Teacher Appreciation Week.


I covered the outside of the jar with Vanilla Cream canvas texture Core'dinations cardstock.  I layered that with a flowered paper I had in my stash from another project.  I then added a flower and a couple butterfly dimensional stickers I picked up at the Dollar Tree.


 I used Microsoft Word again to print out the  sentiment onto Vanilla Cream cardstock.  I used Centeria Script font and it says "Thanks for lighting the way"  The ribbon used is the Ribbon Boutique, from Hobby Lobby and I attached it with a glue dot to make sure it is secure.


Hope you enjoyed today's project, I'll be back tomorrow with Day 4!

Tuesday, May 7, 2013

Teacher Appreciation, Day 2

Hi Everyone!  It's Day 2 of Teacher Appreciation Week!  I created small gifts for my son's teacher for each day of the week.  Here's today's simple project!

I found these lotions at Walmart and love the smell of them and they are only $1.00!!  I thought they would make a fun little gift.

Here's the tag I made to go with it


I also used a free font for this and created in Microsoft Word.  You can find this font here.  I cut this into a 3" circle and layered with one thickness of foam tape onto another circle cut at 3 1/2 inches.  I doodled around the edges with a white gel pen for fun.  All shapes were cut with my Cricut using Craft Room Basics.

I used some ribbon I had in my ribbon stash that I bought at Michaels a long time ago.  It's called Dashes, Dots & Checks - I'm not sure if they still carry this but I thought the purple flowers were cute to attach the tag to the bottle.

Here it is all put together

Hope you enjoyed my little project!  Come back tomorrow for Day 3!

Monday, May 6, 2013

Teacher Appreciation, Day 1

Hi Everyone!  It's Teacher Appreciation Week!  I created small gifts for my son's teacher for each day of the week.  Here's today's super duper simple project!

Start with a tin of mints


and make cute!


For this project I used a bunch of fun free fonts I found online.  I used Century Gothic, Airstream, and Action Is fonts.  I typed up my sentiment in Microsoft Word and printed out on white cardstock.  I cut the sentiment out in a 2 1/2 inch circle and inked the edge with Tim Holtz Distress Ink in Tumbled Glass.  I layered this with one thickness of foam tape onto a scallop circle cut with Craft Room Basics in CCR at 3 inches and adhered to the mint container using my ATG tape gun.  I used all scraps from my scrap bin for this project.  Love that!

I hope you enjoyed my project!  Come back tomorrow for Day 2 of Teacher Appreciation week!