Wednesday, July 31, 2013

Hot Diggity Dog!

Hot dog, hot dog, hot diggity dog....Do you ever get that song from Mickey's Playhouse stuck in your head?  My son is heading into first grade in a couple weeks and doesn't watch the show very often anymore but there must have been a good episode on the other day because this song has been stuck in my head since the weekend.  Which also brought me inspiration for today's card.


I found the  hotdog on the Block Party cartridge.  I sized the card base and all the layers at 2.75" and used CCR to weld two together to make the card base. 


This was a quick and easy card to put together and I used all scraps except for the white card base.


The tag was cut from Baby Shower at .75".  The sentiment is from Pink by Design, Simply Everything stamp set.  And the little bee is a dimensional sticker from EK Success Sticko called Sweet Treats that I picked up at Walmart for a dollar or so.


Have a wonderful day!!

Linking to:
Crazy4Challenges - picnic theme
Fantabulous Cricut - shape card
Die Cuttin Divas - anything goes

Tuesday, July 30, 2013

Tommy Circle card

Hi Friends, welcome back!

This afternoon I have a sketch card to share with you using the sketch from this weeks Mojo Monday challenge.  Here is the sketch:


And here is my card:


I used Birthday Bash for the card base.  It's the card feature from button 18 sized at 5".  I used Honey cardstock for the base.  The pattern papers are from the Tommy paper pack - this will still be available in the new catalog that's effective Aug. 1st.   The smaller circles on top are cut from outdoor denim and white daisy.  The anchor is cut from Life is a Beach at 1 1/2" and I tied a small bow with red baker's twine.  The stamp set is Sail Away and I used outdoor denim and ruby inks.


I matted the inside with outdoor denim and white daisy and left blank.


Hope you're having a great day and a wonderful week!!

Linking to Mojo Monday

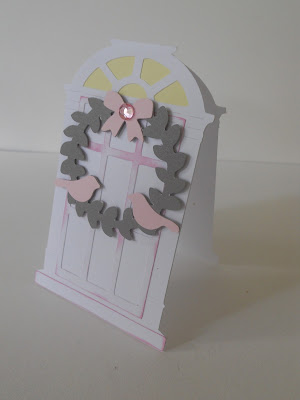
Christmas Door - shape card

Hi Everyone!  Another Christmas card today!  This one is inspired by a color challenge over at Festive Friday.


 I'm more of a traditionalist when it comes to Christmas colors and decorating  so this was definitely a challenge for me, but fun to step out of the box!

Here's what I came up with:


The door come from the Christmas solutions cartridge.  I sized it at 5" and welded two together to make a shape card.  The card and all it's layers are cut with white daisy cardstock.  I used cotton candy ink to highlight some spots on the door.  The wreath comes from Martha Stewart Seasonal Cake Art cartridge.  It is sized at 2 1/2".  The base of the wreath is cut from slate cardstock and the pink for the birds and bow came from my scrap stash. I put a little scrap of yellow behind the window and added a pink rhinestone to the center of the bow.

Inside, I simply stamped it Happy Holidays in cotton candy ink. The sentiment is from an Echo Park stamp set called Season's Greetings by Bella Road.


I like it!  I think I need to find more color challenges so I can step outside my comfort zone a little more :)

Have a great day!!

Linking to Festive Friday

Monday, July 29, 2013

Jolly Santa card

Hello!  I'm back today with another Christmas card - told ya I wasn't done LOL

I started with a sketch for today's card from The Sweet Stop


and here's my card


I used red cardstock for the base.  Both the striped pattern an the green paper comes from My Mind's Eye 6 x 6 pad, Sweater Weather.  I added a scallop ribbon scrap I found on my table.  Santa is from the Jolly Holidays cricut lite cartridge.  He is found on button 3 and I cut him at 2 3/4".  The Ho Ho Ho stamp is from a Scrappy Moms set called Christmas Cheer.  The holly leaves and berries are from a set of Recollections stickers I bought on clearance at Michaels last year.


I left the inside pretty simple so there's a lot of room for writing those holiday messages.  The sentiment is from the same Scrappy Moms set Christmas Cheer.


Hope you enjoy!  I'll see you tomorrow with another project!  Have a great Monday!

Linking to:
The Friday Mashup - Christmas project with stripes
Bitten by the Bug 2 - Christmas in July


Sunday, July 28, 2013

Believe in your Dreams....

Good Morning!!!!  Don't think I'll be that chipper tomorrow when I'm back to work and the weekend is over...then again, I just might  LOL  I am just loving the weather lately!  I'm seeing a lot of people complaining on FB about how too cold it is for summer...blah blah blah.  I don't have a/c and I work from home so when it's too hot - its way too hot!!  and fall is my favorite time of the year, so I'll take this weather any time!!

Today I have a card of encouragement to share with you


I used slate cardstock for the base, 4 1/4 x 5 1/2, a dark purple layer, 4 x 5 1/4, the pattern paper 1/8th of an inch smaller.  The pattern paper is My Mind's Eye, Miss Caroline, Fiddlesticks "You & Me" Bloom paper.  I used scraps for the rest of the project.  The decorative mat is cut from Elegant Edges at 4".  I used button 3, Scallop1.  The bottom green layer is cut using the oblong shift and the white frame is cut using the oblong frame feature (no shift).  The ballet slippers are cut using Creative Memories This & That cartridge at 2 1/2".  I used flower shaped rhinestones around the frame and for the bow on the slippers.  I don't have the packaging for this anymore, but I'm pretty sure I picked them up on clearance at Joann's.  I also used stardust glitz on the slippers for a little extra sparkle.


I used a dark purple mat again on the inside with a cream color mat.  The stamp is a studio g wooden stamp from the dollar section at Michaels.  I used markers to ink the stamp so I could use the different colors.  I used the same MME pattern paper as a border using an EK Success border punch.  Again with this, I don't have the packaging and the name isn't on the punch itself.


I think it came out so pretty, sparkly and feminine!  Have a great day!!!

Challenges:
Die Cuttin Divas - twice as nice - two ballet slippers
Jo's Scrap Shack - bling it up

Saturday, July 27, 2013

Christmas in July # 7 - charger plate

Hello!!  Sorry I missed yesterday, I was so busy with work and then it was so nice and cool I decided to bake muffins last night to stock my freezer.  Then when it gets hot again I have a quick breakfast ready to go, especially when school starts back up!  Only 18 days!!

So, here is the last project for my Christmas in July week - and although I say it's my last project I still have a couple more cards to share this week :)  Once I started with Christmas it seems I couldn't stop!


 Last year after Christmas, Walmart had these charger plates in red, green and gold marked down to 25 cents!!  I totally stocked up and have an entire tote full ready to be altered!  And I know most people use vinyl when altering the charger plates, but I am either out or I just can't find it in my mess, so I used cardstock.

I started with the center image.  I knew I wanted to use an angel and I knew I wanted to use A Quilted Christmas.  It's the cartridge I chose when I signed up for Cricut Circle and I never got around to using it yet.


I started by measuring the inner circle of my charger (8.25") and made a circle in CCR using Cricut Craft Room Basics.  This way I could layer the angel over the top to get a better sizing instead of having to imagine it - because I am ALWAYS wrong when I try to do that  LOL.  Then I went to A Quilted Christmas and using the silhouette feature, I chose the angel located on button 24.  I started with 7 1/2" and adjusted the size on my circle till I was happy.  I ended up with the angel sized at 6.833" and cut it out of black cardstock.

Then I started on the words to go around the edge of the charger.


I started by measuring the space from the edge to where it starts to dip down - 2".  Based on this, I knew I wanted my letters to be 1 1/2 inches, and I knew what I wanted it to say, I just didn't know what font to use.

Recently, I discovered the text feature in CCR.  OMG this makes finding a font on my cartridges SO MUCH EASIER!!! It used to be that I would type a letter into the image search and just go through them all - what a pain in the hiney!   If you click on text, then add a new text box, a box will pop up on your virtual mat.  You type in the phrase you want to cut out and then just click on the cartridges in the drop down menu.  It will change your font as you click on them so you can see exactly what your phrase will look like!  I love it!!


So by doing this, I came across this wonderful font on the Nursery Rhyme cartridge.  Honestly, I didn't even know this cart had a font!  I thought it was perfect for what I wanted and cut my words out with black cardstock.

I glued all of my cuts/words down with a liquid quick dry glue and I thought I was done.  But my husband said it was too plain and it "needed something, maybe some color or something".  So back I went to CCR looking through my Christmas themed cartridges.  I stumbled on the Christmas flower and the holly berry on the Joys of the Season cartridge.  I played with the sizes until they would fit the space I needed and cut them out.  I added some chunky gold glitter to the center of the flower and added some spots of red glitter in between each of the words.


I was pretty happy with the end result and got a thumbs up from the hubs  :-)

BTW - Christmas is only 150 days away!!!  I hope everyone is having a wonderful weekend!!

Linking to:  Little Scrap Pieces


Thursday, July 25, 2013

Christmas in July # 6

Hi everyone!  I'm here with Christmas in July project # 6! Today I have a card to share:


I started with a kraft card base, 4 1/4 x 5 1/2.  I layered a red mat 4 x 5 1/4 and a holly berry pattern mat 3 3/4 x 5.  The pattern paper is from Recollections Jolly Jamboree paper pad I picked up last year.  Then I used the Ornamental Cheer stamp set that coordinates with the Art Philosophy cartridge.  I cut a background red ornament at 3 1/4" and the stamped ornament at 3" in kraft.  I added some twine to the top of the ornament and I used the Martha Stewart branch punch to add around the top.  Ink color is New England Ivy.


I used the Merry Christmas stamp from the same set on the inside.


I love how easy it is to create with the the cricut coordinated stamp sets!  

Hope you enjoyed today's Christmas project.  I'll be back tomorrow with the final project for Christmas in July!  Have a wonderful day!


Beach - altered picture frame

Welcome friends!  I have a fun altered picture frame to share today!


I started with one of those dollar frames from Michaels, painted it blue and you can't see it in the pic, but I added a layer of glitter paint as well.  Then I tore some strips of kraft cardstock and layered it on the bottom for sand.  I only glued down the bottom part of the strips so I could distress the edges a bit and then went over it with Tim Holtz tea dye distress ink.


I cut the chair from the Life's a Beach cartridge at 3" and sponged it with a bit of indian corn blue ink.  It's adhered with foam tape to pop it up a bit. The pail and shovel were also cut from Life's a Beach at 1.153".  The flip flops were cut from the Best of 2010 cartridge at 1.361".  I used scrap paper for all my pieces.


The umbrella was cut from Life's a Beach at 3".  The sun was also cut from Life's a Beach at 3".  I inked the edges with tea dye distress ink and raised the center on foam tape.  The bird was cut from Indie Art at 1.5".  This bird doesn't have a solid layer and I wanted the white underneath so I used CCR hide option to erase the lines and cut the piece solid.


I think it turned out pretty cute!  What do you think??


Wednesday, July 24, 2013

Hip Hip Hooray - Happy Birthday card

Good afternoon everyone!  I'm back today with a quick birthday card to share!

I started with a sketch from Crazy4Challenges


and here's my card


I used the CTMH Dream Pop paper collection - this isn't available any more, but ANY of the collections would work, especially some of the new ones coming Aug. 1st!!  I cut a mat from white daisy and embossed with the spots and dots cuddlebug folder.  The 3 pointy circles are cut from the Artiste cartridge, page 35 under Accent 3.  I cut the orange layer at 2 3/4" and the pattern layer at 2 1/2".  I adhered 2 of them directly onto the card front an the third one I centered and adhered with foam tape.  The sentiment is from the Cricut Artiste Birthday stamp set that comes with the Artiste collection.  The banner is on page 66, accent 3 shift key and was cut at 3/4" as the stamp set says.  I used cotton candy ink.


The happy birthday stamp is from the Joyful Birthday Occasions set and is stamped with cotton candy ink. 


Thanks for joining me today!  I'll be back tomorrow with more projects!  : )


Christmas Ornament Tag - Christmas in July # 5

Welcome to project # 5 in my Christmas in July week!

If you're anything like me, you go through a lot of tags at Christmas.  So I decided it was time to get started on them!


I used Art Philosophy for the tag base.  This one is found on page 50 under the card feature and is cut at 3 1/2" with white daisy cardstock.  I used a swirl stamp from an Inkadinkado set called Snowflakes with indian corn blue ink. I added stardust glitz to the dots on the swirl.  The ornament is cut from the Artiste cartridge.  It is located on page 53 under accent 3.  I cut the base layer out of indian corn blue cardstock and the decorative layer out of white daisy using the shift key.  They were sized at 2.153" and I cut 3 of them for each tag.  I put the layers together and scored each down the center an adhered them together to form a dimensional ornament.


The sentiment inside is from the Ornament Cheer Holiday stamp set in indian corn blue ink.


The final touch was to add a silver bow and some blue and white baker's twine.

Hope you all enjoyed today's Christmas in July project!  Only 2 more to go!  : )  Have a great day everyone!


Tuesday, July 23, 2013

When Life Hands You Lemons..... a card

No, your eyes are not deceiving you.  Two posts again today!  I'm on a roll this week!

I started with a sketch from Mojo Monday


Then I incorporated some requirements for a couple of other challenges.  The first one is Fantabulous Cricut where the challenge is to use a cricut cut of a piece of fruit.  And the other one is from Paper Playtime where the challenge is to use pattern paper.

Here's my card:


Card is 4 1/4 x 5 1/2 yellow cardstock.  White mat is 4 x 5 1/4 and the green pattern mat is 3 3/4 x 5.  The black strip is 1 1/2 x 3 3/4.  The decorative mats were cut from Elegant Edges using button 2 with the oblong, shift features.  The yellow mat is 3" and the white one is 2 3/4".  The lemon and lemon slice are cut from the Savory lite cartridge at 1 1/2", the flower is from Accent Essentials, two cuts 1 1/4" layered.  The brad and ribbon are from my stash.  I added some stardust glitz to the lemon for sparkle. The pattern papers are from DCWV the Lemon Flower Stack.


Inside mat is 4 x 5 1/4 and the lemonade pitcher is from the Savory Lite cartridge cut at 1 1/2".  Sentiment stamp on front and inside are from Purple Onion Designs.


I hope you enjoyed today's projects!

Linking to:


Poinsettia Gift Box - Christmas in July # 4

Hi Everyone!  Welcome to project # 4 in my Christmas in July week!

Today I have a little gift box to share with you.  Going back to using the cartridges I don't use very often, I pulled out Garden Soup and Joys of the Season cartridges.


I cut this cute little hexagon box from the Garden Soup cartridge.  It's found under button 41, honeycomb layer. I cut it at 9 inches, fit to page with red cardstock.  I measured the sides and cut 6 pieces of pattern paper 1 1/2 x 2 with my paper trimmer.


Then I found a basic hexagon to go on the top under button 35.  I used CCR to layer it over the top of the box image to get the perfect size.  It came out to 3.292 x 2.819.  The pattern paper is from My Mind's Eye, Sweater Weather, 6 x 6 pad.  The stamp on the front is from a Fiskars stamp set called Seasons Greetings and I stamped it with red ink onto kraft cardstock and fussy cut it out.


The poinsettia is cut from the Joys of the Season cartridge.  It's under button 38, the layer feature.  I used CCR hide option to hide the berries and only cut the petals.  The bottom 2 layers are cut at 2 3/4" and the top 2 layers are cut at 1 3/4".  I used a quick dry liquid glue to attach them all together in the center.  I curled the petals with a pencil and inked the petal edges with New England Ivy.  Then I added some more liquid glue to the middle and poured some chunky gold glitter for the center of the flower.  I adhered it to the top of the box with liquid glue as well.


To finish it off I added a magnet closure to the flap and the front panel to keep it closed.

I hope you enjoyed todays Christmas project!  Have a wonderful day!!


Monday, July 22, 2013

Winter Wishes - Christmas in July # 3

Welcome Friends!  Today's project is more on the lines of a Winter theme vs. Christmas but I figure they kind of go hand in hand.

My card today was inspired by a sketch over on The Sweet Stop sketches blog.  I just recently discovered this blog and I am in love!!!

Here is the sketch from this week:


And the spin on the sketch is to use doilies.  I immediately thought of snowflakes!  I love all the intricate designs and how no two are alike.  I'm not a  fan of snow when I'm out shoveling, but if I'm sitting on my couch with a warm cup of coffee gazing out the window - then I love it!  

Here's my take on  the sketch:


Card base is 5 x 5 with slate cardstock.  The mat layer is a snowflake paper from DCWV Arctic Wishes cut 4 3/4 x 4 3/4.  I inked the edges with indian corn blue ink.  The snowflakes are cut from a variety of cartridges.  I used Artiste, Christmas solutions, and Art Philosophy.  I inked the edges of the snowflakes also with indian corn blue ink so they stand out a bit from the background paper.


The stamp for the center of the large snowflake is from C1469, Dec. 25th Holidays set.  This is a really nice stamp set for the holidays, and it also coordinates with the Art Philosophy cartridge.  I used stardust glitz in spots around the snowflakes to give them a little shimmer and shine.  The silver ribbon is a Celebrate It ribbon I picked up on clearance at Michaels last year after the holidays.


On the inside I used the same snowflake paper to cut a mat 4 3/4 x 4 3/4.  The snowflake comes from the Best of 2009 cartridge cut at 4 1/2".  I also inked the edges of this one with indian corn blue ink as well.


I am really happy with how it turned out and working from a sketch made it come together so easily!
I hope you enjoy!  I'll be back tomorrow with # 4 of Christmas in July.  Have a great day!!

Linking to Sweet Stop Sketches challenge