Showing posts with label Cricut - Artiste. Show all posts

Sunday, February 2, 2014

Baby Nursery - Wall Art with Cricut and CTMH

Good Morning everyone!

My husband and I were at the hospital this past Friday for an ultrasound.  Baby is healthy and moving like CRAZY!!  In fact, they couldn't get all the pics they wanted because the baby was moving so much so I'll have to go back again in a few weeks  :)  I don't mind - I could sit and watch my baby all day on that screen!  They were however able to determine the baby's gender!!


We are all excited!  My son especially because he's been saying it's a girl since we found out and he was right!

So now we know, I can really start working on baby projects!  Of course we are moving in 13 days so I need to deal with that first - but I just haven't brought myself to pack up my craft room yet.  I know I need to start soon....In the meantime, it's still out when the mood strikes me.  Like last night!  I was on Pinterest gathering baby girl ideas and came across the most adorable owl canvas.  I had already decided weeks ago, girl or boy, the nursery was going to have an owl theme.

So I sat down with a 12 x 12 blank canvas.  I painted it pink with Folk Art Baby Pink acrylic paint.  While it was drying I cut out pieces with the cricut.


I started with the adorable owl from Create a Critter 2.  I love the hearts on this owl!  I sized it at 5" for my canvas using cocoa, blush, buttercup, and the dark pink was from my scraps.


Then I added the phrase.  The letters were cut using the Rock Princess cartridge using the heart font.  I cut the letters at 1.25".

Then, using Cricut Artiste I cut hearts to go both above and below the phrase.  They were cut at 1".  Once I had all the paper cuts down, I went over it all with a couple coats of Mod Podge to seal it all in.  


After the Mod Podge dried, I added some flowers and buttons from my stash and I added the glitter detail to the owl and hearts using some Studio G glitter glue.


And here it is all together.  The space over the owl was left empty on purpose so that after we agree on a name I can go back and add it in.  We have it narrowed down to two possibilities :)

Linking to:
Little Scrap Pieces - any card, project or layout
BBTB2- baby challenge

Hope you enjoy and come visit again!!  Have a wonderful day, and if you are going out for the Superbowl today, please be safe!

CTMH NEWS:  The new idea book is now available on my website!  If you haven't checked it out, please do - lots of new products and gorgeous papers!!  Click here to view - or leave me a comment if you would like me to send you your own book. 

We also have a couple of great specials going this month!


Embossing is Boss!  If you haven't heard, CTMH is now selling embossing folders!  YAY!!!!
There are 5 designs available for purchase.  They are $8.95 each, but you can get yours for FREE!!! During the month of February, you qualify to receive a free embossing folder for every 2 packs of bulk cardstock (single color or combo) you purchase! That is a savings of $8.95! Select from 5 new embossing folder designs—dot, chevron, quatrefoil, damask, or stripe—when you submit a qualifying order.


And of course, with the start of each new month begins a new Stamp of the Month!  This month we have "Wild about Love" waiting for you!  Isn't it so cute!!  And it coordinates with the Cricut Art Philosophy cartridge! The stamp of the month is only available in the month it is presented.  You can purchase separately for $17.95, or you can get it for only $5.00 with any $50.00 purchase.

Check out this video featuring some new stamp sets and one of the exclusive Hostess stamp sets.

Lots of great stuff going on!  I'll be posting soon with some of the new, exclusive Hostess only stamp sets available from this book soon also.  If you have any questions at all, or are interested in hosting your own online gathering to earn exclusive Hostess only items, free product and half off items please let me know!  

Have a wonderful day!!!
Hugs ~ Dawn

Wednesday, September 4, 2013

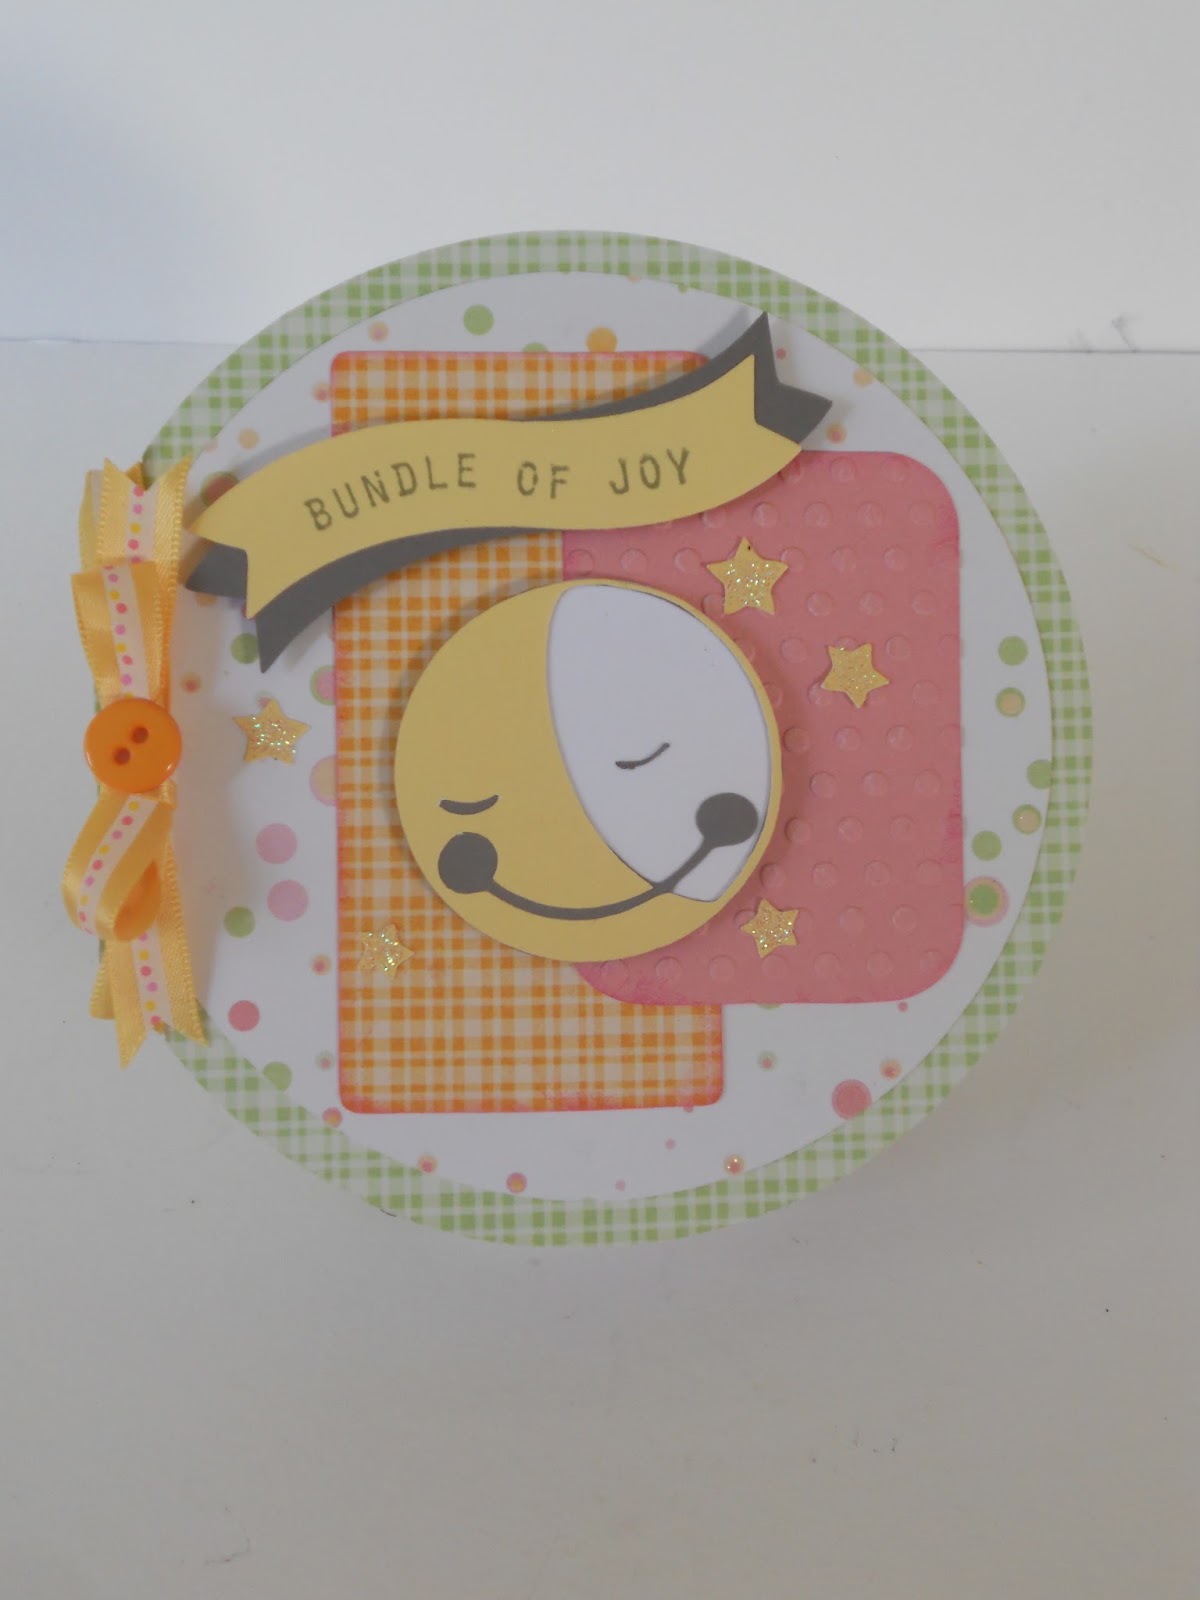
Bundle of Joy

Hi Everyone!  I have a sweet baby card to share today.

I started with a circular sketch
and here's my take on it...

 I used Birthday Bash for the card base at 5".  The circle layer was also cut from Birthday Bash.  I just eyeballed the size of the rectangles till I liked how it looked and rounded the corners. The solid pink rectangle I ran through the cuddlebug with the polka dot embossing folder.  The banner was cut from the Artiste cartridge and the moon and stars are from the Baby Shower cartridge.  The pattern papers are from the DCWV stack Nana's Nursery, Baby Girl.  Cardstock colors used are Blush, Buttercup, White Daisy and Slate.  The sentiment is a mini clear stamp I picked up at Joann's and I used Slate ink.  I added clear glitter glue to the stars and the ribbon and button are from my stash.


For the inside, I cut two more circles from the Birthday Bash cartridge.  One in Blush and one in White Daisy.  I picked up the sentiment stamp from an Ebay Store called PrairiePeddler.  The stars are from the CTMH set called Glory to God.  I  stamped the sentiment in Slate and the stars in Buttercup.

Hope you all are having a wonderful day!!

Linking to:
Crazy4Challenges - buttons and bows
Craftin Desert Divas - babies
Paper Playtime - use 3 pattern papers
Die Cuttin Divas - sketch

September Specials!
You are My Happy - National Stamping Month
Poster Tidings - Stamp of the Month

Tuesday, September 3, 2013

Gift Ideas from my Kitchen - Crunchy Pumpkin Pie Granola

Hi Everyone!  I hope you had a wonderful weekend!

Since it's cooled off I've been able to turn the oven on again and test out some recipes!  After my craft room, the kitchen is my next favorite place to create.

 I've started thinking about Thanksgiving.....this is my third year hosting dinner for my family.  I was so nervous that first year!  And, while I don't have all the kinks worked out, I try to have fun with it and not be so stressed.  My biggest obstacle is time management and getting dinner on the table as scheduled and not having everyone starve while they wait. Last year, for each person,  I decorated some small mason jars and filled them with a snack mix.

This year I wanted something different that incorporated the flavors of fall - to me, that is pumpkin and apple.  I came across a recipe for Crunchy Pumpkin Pie Granola on Allrecipes.com and tested it out this morning.  This granola is so yummy, took only 15 minutes to mix up and made my house smell wonderful!

Fresh from the oven
I found these little zip lock bags to package the granola in.  I find zip lock bags are much easier for my son to open and close instead of a twist tie.  Less mess for me to clean up too.

And of course I had to dress them up and make them look nice!


I used the cricut Art Philosophy cartridge to cut the fry box at 9" - you can get 2 of these from a 12 x 12 sheet of paper.  I used one of the  designs from the Huntington paper pack for the box and the coordinating cardstock in the pack for the other cuts.  For the turkey and the sentiment I used the Perfect Fit - Thanksgiving stamp set with the cricut Artiste cartridge.  I used Barn Red ink to stamp the turkey. 


And I used Cocoa ink for the sentiment and Olive ink for the flourish.  I used Goldrush to ink all the edges of each piece.


And here it is all put together.


Cute and yummy!  One detail for Thanksgiving done!  Yay!

Here is the link to the recipe at Allrecipes.com.

Have a wonderful week!!

Linking to:
BBTB2 - fry box challenge
Little Scrap Pieces - any project

September Specials!
You are My Happy - National Stamping Month
Poster Tidings - Stamp of the Month


Monday, September 2, 2013

BOO! An Artiste Halloween Card

Ahhhh...it' so nice and cool out today!  A wonderful breeze coming in through the window and I had a whole day to myself in my craft room!  And even better than that, my hubby is making homemade pizzas for dinner as I type this!  yum!!

So with the cooler weather - and I am enjoying this as much as I can because I know it will be hot again - I am back in the Halloween mood!  I have been working on Halloween cards and home dec projects all day.

Here's the first card ~


The card base is from the Artiste cartridge. It is found under Accent 4, shift, button 48.  I sized the card at 5 1/2" in height and it came out to just about 4" in width.  I found an oval on the Artiste cartridge as well (Accent 2, button 6) and sized it in CCR to fit perfectly over the center of the card base.  I'm not sure who makes the striped paper I used - it was a 12 x 12 stack, but the cover had come off.  The cute ghost is from Paper Doll Dress Up and was cut at 3 1/2".  I used a black gel pen to go over the little cuts on the ghost to make his face.  I also stamped two black bats from the Creepy Creatures stamp set with black ink and inked the edges of the oval as well.


I cut the same oval I used on the card front, but this time in white for the inside.  Boo! is cut from the Artiste cartridge at 1".  It is found under Basic, shift, button 47.  I used the bats again and the little rat from the Creepy Creatures stamp set.


Super simple and, I think, super cute!!  I hope you're all having a fabulous day!  Back to work for me tomorrow.  I'm so thankful I was able to take advantage of today.  Have a great week!!

September Specials!
You are My Happy - National Stamping Month
Poster Tidings - Stamp of the Month

Monday, August 5, 2013

Thank You tag

Hi everyone!  Today I have a quick Thank You tag to share.


I used the Artiste cartridge to make the base of the tag.  I used accent 4 under the 6 key at 3".  I cut it out 3 times, once in the front paper, once from a cereal box for stability and once from the back paper and I glued them all together.  The paper is from a Prima 6 x 6  pad called Nature Garden and I inked around the edges with Tim Holtz Stormy Sky distress ink.  

close up to see how they are welded together

For the sentiment, I used the stamp set Casual Expressions that coordinates with the Artiste cartridge.  The cut for the sentiment is from the B key using accent 3 feature at 1 1/2".  Then from the Home Decor cartridge I used border 1 - this is found on button 2 under the basic feature at 1 1/2" an welded it to the cut for the sentiment from the artiste cartridge.  I stamped the sentiment with slate ink. I added some Prima flowers and some buttons to complete the front.


For the back, I found this confetti-like parchment paper in my scraps to use and inked the edges with Tim Holtz Tea Dye distress ink.  


I used my crop-a-dile to punch a hole in the top and added some ribbon to finish it off.

Have a  wonderful day!!!

Linking to: Little Scrap Pieces

August Special Sweetening the Deal - spend $50 and get the August stamp of the month for FREE!!


Thursday, August 1, 2013

A birthday gift card holder

Hey everyone!!  Hope you are all having a fantastic week so far!  Today I have a simple birthday gift card holder to share  using the Cricut Artiste cartridge.  Have I told you how much I love this one???

I used the gift card found under the 'J' key


The base is cut with olive cardstock, the outdoor denim cardstock is some I had leftover from the Tommy collection. (love using those scraps!!)  The pattern paper is from the Avonlea collection which isn't available any longer - but the new idea book begins today!!  And with that new paper collections!!    Using the card function, I cut the holder at 2.75".  Once it was cut and scored I measured the top to know what size to cut my mats at.  Then, with the Casual Expressions stamp set that coordinates with the Artiste cartridge I cut the oval at 1 1/4" and stamped it with outdoor denim.


I matted the inside and using the Joyful Birthdays stamp set I stamped Happy Birthday in olive.  I added a button I had to the top to finish it off.


What a great way to dress up a boring gift card!!  Have a wonderful day!!

Linking to:
Craftin Desert Divas - Birthday 
My Craft Spot - gift card holder

August specials - 


August is an especially sweet time to shop—when you place an order of $50 or more during August, you’ll receive the August Stamp of the Month set, A Chocolate Affair (S1308A), FREE! This D-size stamp set with a retail value of $17.95 includes 16 images and sentiments that will have your friends salivating over your chocolatey layouts and cards. Make every project a treat with this must-have set.


Wednesday, July 24, 2013

Hip Hip Hooray - Happy Birthday card

Good afternoon everyone!  I'm back today with a quick birthday card to share!

I started with a sketch from Crazy4Challenges


and here's my card


I used the CTMH Dream Pop paper collection - this isn't available any more, but ANY of the collections would work, especially some of the new ones coming Aug. 1st!!  I cut a mat from white daisy and embossed with the spots and dots cuddlebug folder.  The 3 pointy circles are cut from the Artiste cartridge, page 35 under Accent 3.  I cut the orange layer at 2 3/4" and the pattern layer at 2 1/2".  I adhered 2 of them directly onto the card front an the third one I centered and adhered with foam tape.  The sentiment is from the Cricut Artiste Birthday stamp set that comes with the Artiste collection.  The banner is on page 66, accent 3 shift key and was cut at 3/4" as the stamp set says.  I used cotton candy ink.


The happy birthday stamp is from the Joyful Birthday Occasions set and is stamped with cotton candy ink. 


Thanks for joining me today!  I'll be back tomorrow with more projects!  : )


Christmas Ornament Tag - Christmas in July # 5

Welcome to project # 5 in my Christmas in July week!

If you're anything like me, you go through a lot of tags at Christmas.  So I decided it was time to get started on them!


I used Art Philosophy for the tag base.  This one is found on page 50 under the card feature and is cut at 3 1/2" with white daisy cardstock.  I used a swirl stamp from an Inkadinkado set called Snowflakes with indian corn blue ink. I added stardust glitz to the dots on the swirl.  The ornament is cut from the Artiste cartridge.  It is located on page 53 under accent 3.  I cut the base layer out of indian corn blue cardstock and the decorative layer out of white daisy using the shift key.  They were sized at 2.153" and I cut 3 of them for each tag.  I put the layers together and scored each down the center an adhered them together to form a dimensional ornament.


The sentiment inside is from the Ornament Cheer Holiday stamp set in indian corn blue ink.


The final touch was to add a silver bow and some blue and white baker's twine.

Hope you all enjoyed today's Christmas in July project!  Only 2 more to go!  : )  Have a great day everyone!


Monday, July 22, 2013

Winter Wishes - Christmas in July # 3

Welcome Friends!  Today's project is more on the lines of a Winter theme vs. Christmas but I figure they kind of go hand in hand.

My card today was inspired by a sketch over on The Sweet Stop sketches blog.  I just recently discovered this blog and I am in love!!!

Here is the sketch from this week:


And the spin on the sketch is to use doilies.  I immediately thought of snowflakes!  I love all the intricate designs and how no two are alike.  I'm not a  fan of snow when I'm out shoveling, but if I'm sitting on my couch with a warm cup of coffee gazing out the window - then I love it!  

Here's my take on  the sketch:


Card base is 5 x 5 with slate cardstock.  The mat layer is a snowflake paper from DCWV Arctic Wishes cut 4 3/4 x 4 3/4.  I inked the edges with indian corn blue ink.  The snowflakes are cut from a variety of cartridges.  I used Artiste, Christmas solutions, and Art Philosophy.  I inked the edges of the snowflakes also with indian corn blue ink so they stand out a bit from the background paper.


The stamp for the center of the large snowflake is from C1469, Dec. 25th Holidays set.  This is a really nice stamp set for the holidays, and it also coordinates with the Art Philosophy cartridge.  I used stardust glitz in spots around the snowflakes to give them a little shimmer and shine.  The silver ribbon is a Celebrate It ribbon I picked up on clearance at Michaels last year after the holidays.


On the inside I used the same snowflake paper to cut a mat 4 3/4 x 4 3/4.  The snowflake comes from the Best of 2009 cartridge cut at 4 1/2".  I also inked the edges of this one with indian corn blue ink as well.


I am really happy with how it turned out and working from a sketch made it come together so easily!
I hope you enjoy!  I'll be back tomorrow with # 4 of Christmas in July.  Have a great day!!

Linking to Sweet Stop Sketches challenge


Sunday, July 21, 2013

Ice Cream Cone treat box

Hello Friends!  I have a cute treat box to share with you today!


I used cricut cartridge Sweet Tooth Boxes.  The ice cream cone box is the second one.  I cut it at 8 1/2", once assembled it came to 7" tall and 3 1/2" diameter at the widest point.


I used papers from the Chantilly paper pack to make this project.  The bottom is cut with Champagne cardstock that comes in the paper pack, or can be purchased separately. 

The sentiment is from D1525, Casual Expressions stamp set.  


This is one of the Artiste coordinating stamp sets.  I cut the oval at 1 1/4" as stated on the stamp set in white daisy and then at 1 1/2" in the Chantilly paper to layer.

Inside view
I cut the insert also with the same paper, you could use this to add a cupcake inside, or leave it out and put a small treat bag inside.

I think this came out so cute!  I don't use this cartridge enough!!  I hope you enjoy and are having a fabulous weekend!!

Linking to Bitten by the Bug 2 challenge and Die Cuttin Divas challenge